1. Disable Root Login
Disabling root login is a good security practice as it reduces the risk of unauthorized access to your system. Here are general steps to disable root login on a Linux system:
Benefits of Disable Root Login
1. Reduced Attack Surface:
- The root user possesses immense power within a system, making it a prime target for attackers. Disabling root login eliminates this high-value target, forcing attackers to compromise a regular user account first, significantly raising the difficulty of a successful breach.
How to Disable Root Login ?
Sample mysql commands:
mysql
which mysql
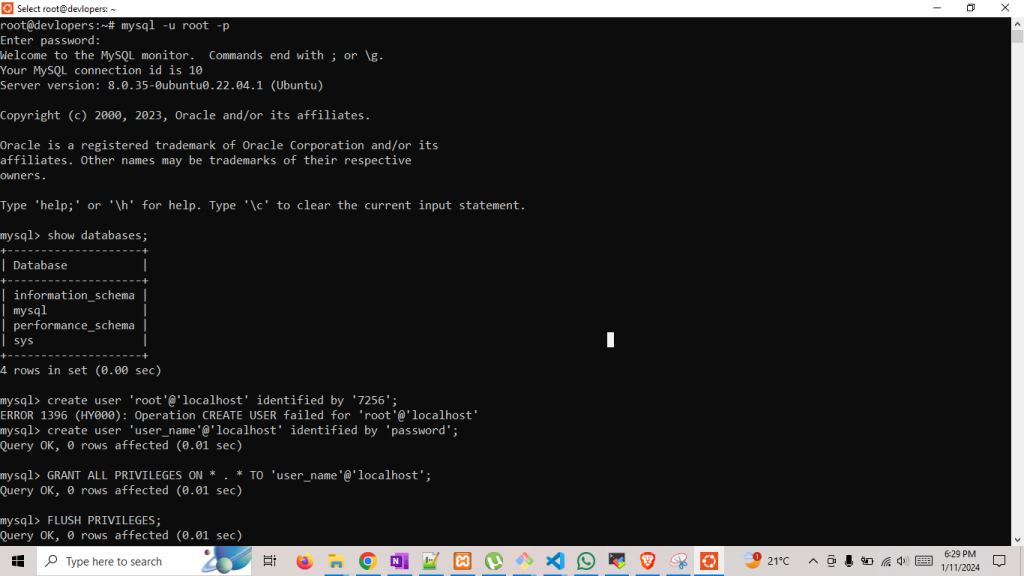
mysql -u root -p
show databases;
create user 'user_name'@'localhost' identified by 'password';
GRANT ALL PRIVILEGES ON * . * TO 'user_name'@'localhost';
FLUSH PRIVILEGES;
SHOW GRANTS user_name;
create database database_name;
2. Use Fail2ban to Secure Your Server
What is fail2ban ?
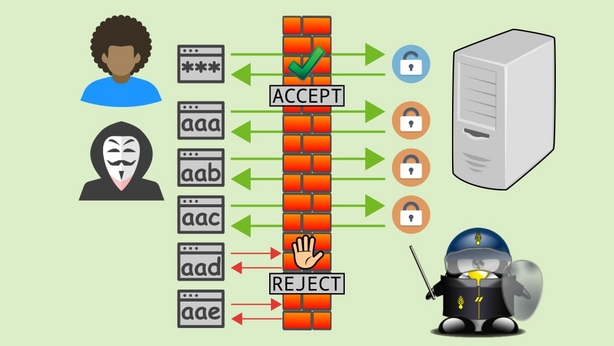
Fail2Ban is like a bouncer for your server. It’s a security tool that helps protect your system from brute-force attacks by monitoring log files for malicious activity. When it detects multiple failed login attempts or other suspicious behavior from an IP address, it dynamically updates firewall rules to block that address and prevent further access.
Security thread using of fail2ban
Fail2ban is a powerful tool that can be used to protect Linux servers from a variety of attacks. Here are some of the benefits of using Fail2ban:
- Improved security: Fail2ban can help to improve the security of your Linux server by blocking malicious IP addresses. This can help to protect your server from brute-force login attempts, denial-of-service (DoS) attacks, and port scans.
- Reduced load on your server: Fail2ban can help to reduce the load on your server by blocking malicious traffic. This can improve the performance of your server and make it less vulnerable to attack.
- Compliance: Fail2ban can help you to comply with a variety of security regulations, such as PCI DSS and HIPAA.
- Easy to use: Fail2ban is a relatively easy to use tool. It can be installed and configured with a few simple commands.
- Flexible: Fail2ban is a flexible tool. It can be configured to meet the specific needs of your server.
Insallation process
sudo apt-get install fail2ban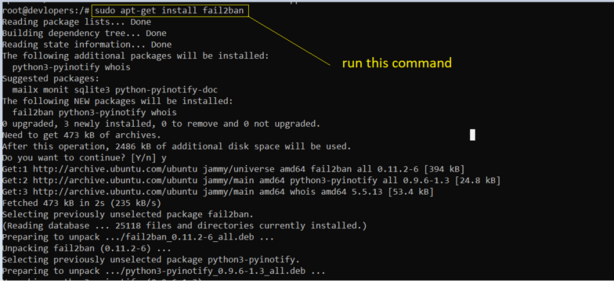
2nd step go to below path and add below code
cd /etc/fail2ban[sshd]
enabled = true
port = ssh
filter = sshd
logpath = /var/log/auth.log
maxretry = 3
findtime = 300
bantime = 86400
ignoreip = 127.0.0.1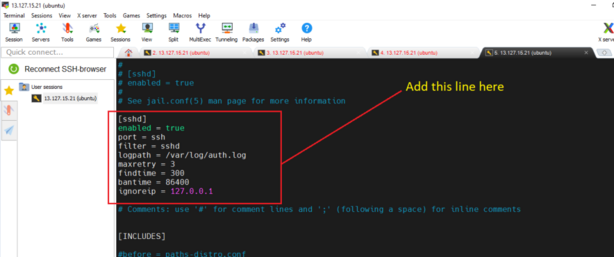
After adding save and exit.
Restart the server
sudo systemctl restart fail2ban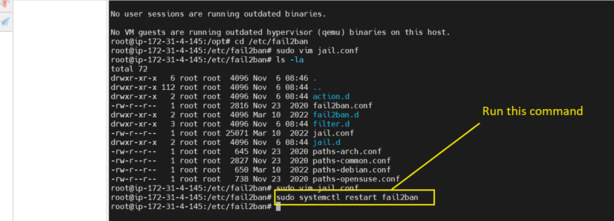
Once Fail2ban is enabled and running, it will start monitoring the SSH service for malicious activity. If Fail2ban detects malicious activity, it will ban the IP address that is responsible for the activity.
3. Limit Access to MySQL Server.
This is important security measure is to limit access to your MySQL server. By default, MySQL allows remote connections from any host, which can be a security risk. You should only allow connections from trusted hosts or IP addresses.
1. Create MySQL Users:
- Use the MySQL command-line tool or a MySQL client like phpMyAdmin to connect to your MySQL server.
mysql -u root -p- Create a new MySQL user with a strong password. Replace
'new_user'and'password'with your chosen username and password.
CREATE USER 'new_user'@'localhost' IDENTIFIED BY 'password';- You can replace
'localhost'with the specific IP address or hostname if you want to allow remote access for this user.
2. Grant Specific Privileges:
- Grant the user the minimum necessary privileges based on your application’s requirements. For example, if the user only needs to read from a specific database:
GRANT SELECT ON database_name.* TO 'new_user'@'localhost';3. File Permissions
File permissions control who can access, modify, or execute files and directories, ensuring data integrity and confidentiality. The chmod command is used to change file permissions.
Symbolic Notation:
- Using symbolic notation to set read, write, and execute permissions. For example, to give read and write permissions to the owner and read-only permission to others:
chmod u=rw,go=r filename
Numeric Notation:
Using numeric notation where each digit represents the permissions for the owner, group, and others. The values are calculated by adding the permissions:
Read (r) = 4
Write (w) = 2
Execute (x) = 1- This sets read, write, and execute permissions for the owner and read and execute permissions for others.
chmod -R 755 directory
4. Monitor your MySQL server for suspicious activity
Monitoring your MySQL server for suspicious activity is crucial for identifying potential security threats and taking timely actions to mitigate risks. Here are some steps and tools you can use to monitor MySQL for suspicious activity:
1. MySQL General Query Log:
- Enable the MySQL general query log to record all SQL statements received from clients. Be cautious, as this can generate a large log file:
# Add the following to your my.cnf or my.ini file
[mysqld]
general_log = 1
general_log_file = /path/to/general.log
5. Securing Local and Remote Database Access
1. Log in to MySQL:
mysql -u root -p2. Set or Change Password:
CREATE USER 'wizbrand_learning'@'localhost' IDENTIFIED BY '8789';
GRANT ALL PRIVILEGES ON *.* TO 'wizbrand_learning'@'localhost';
FLUSH PRIVILEGES;
Security thread if i ignore password for mysql ?
Ignoring or neglecting to set a password for MySQL introduces significant security risks to your database and server. Here are some of the security threats and consequences associated with not having a password for your MySQL database:
- Unauthorized Access:
- Without a password, anyone with access to your server can connect to your MySQL database. This includes malicious actors who may attempt to exploit vulnerabilities or gain unauthorized access to your data.
- Data Breach:
- Lack of authentication allows unauthorized users to read, modify, or delete your database data. This could lead to a data breach, exposing sensitive information and violating privacy regulations.
- Database Manipulation:
- An attacker could modify or delete your database records, disrupting your application’s functionality or causing data loss.
6. Enable Network Security
Restrict access to your MySQL server by allowing connections only from trusted IP addresses. Use firewall rules or the bind-address directive in your MySQL configuration file to limit access. Additionally, consider running your MySQL server on a non-default port to reduce the risk of automated attacks.
To change the bind-address and port of the MySQL server, you need to edit the MySQL configuration file. The MySQL configuration file is typically located at
/etc/mysql/mysql.cnfTo edit the MySQL configuration file, use a text editor such as nano or vim. For example, to edit the MySQL configuration file using nano, run the following command:
Example :-
[mysqld]
bind-address = 192.168.1.100
port = 3307
7. Secure Against Attackers
To make a MySQL system secure, you should maintain the following suggestions :
- Require all MySQL accounts to have a password.
- Make sure that the only Unix user account with read or write privileges in the database directories is the account that is used for running mysqld.
- Never run the MySQL server as the Unix root user
- Do not grant the FILE privilege to nonadministrative users
- Do not permit the use of symlinks to tables.
- Stored programs and views should be written using the security guidelines
- If you do not trust your DNS, you should use IP addresses rather than hostnames in the grant tables.
- If you want to restrict the number of connections permitted to a single account, you can do so by setting the max_user_connections variable in mysqld.
8. Granting Privileges to User in MysQL
There are multiple types of privileges that can be granted to a user account.
Example :-
Grant All Privileges on a Specific Database:
Suppose you want to grant all privileges to a user named your_user on a database named your_database. The syntax for granting all privileges on a specific database is as follows:
GRANT ALL PRIVILEGES ON your_database.* TO 'your_user'@'localhost' IDENTIFIED BY 'your_password';
Grant All Privileges on All Databases:
If you want to grant all privileges to a user on all databases, you can use the wildcard * for the database name:
GRANT ALL PRIVILEGES ON *.* TO 'your_user'@'localhost' IDENTIFIED BY 'your_password';
Security thread if i ignore Privileges
Ignoring privileges and not properly managing user privileges in MySQL can lead to significant security threats. Properly assigning and managing privileges is a crucial aspect of securing your MySQL database. Here are some security risks and considerations if you ignore privileges in MySQL:
- Unauthorized Access:
- Ignoring privileges may result in granting overly broad access to users. This could lead to unauthorized users gaining access to sensitive data or making unintended modifications to the database.
- Data Exposure:
- Users with excessive privileges may have access to confidential or sensitive information, leading to data exposure and potential breaches.
- Data Manipulation:
- Users with excessive privileges can modify or delete data, impacting the integrity of the database. This could result in data loss or unauthorized changes.
- Security Principle Violation:
- Ignoring the principle of least privilege violates a fundamental security principle. Users should only be given the minimum level of access necessary to perform their tasks.
- SQL Injection Exploitation:
- Without proper privilege management, SQL injection vulnerabilities become more severe. An attacker might exploit injection vulnerabilities to gain unauthorized access or manipulate data.
9. Installing Apache and Updating the Firewall
The Apache web server is among the most popular web servers in the world. It’s well documented, has an active community of users, and has been in wide use for much of the history of the web, which makes it a great choice for hosting a website.
sudo apt update
sudo apt install apache2
sudo ufw app list
Here’s what each of these profiles mean:
- Apache: This profile opens only port
80(normal, unencrypted web traffic). - Apache Full: This profile opens both port
80(normal, unencrypted web traffic) and port443(TLS/SSL encrypted traffic). - Apache Secure: This profile opens only port
443(TLS/SSL encrypted traffic).
For now, it’s best to allow only connections on port 80, since this is a fresh Apache installation and you don’t yet have a TLS/SSL certificate configured to allow for HTTPS traffic on your server.
sudo ufw allow in "Apache"
sudo ufw status10. Create a Backup
systemctl stop mysqlLocate your database directory. It should be /var/lib/mysql/ on most systems but if that directory doesn’t exist, examine /etc/mysql/my.cnf for a path to the data directory
Create a directory to store your backups. This guide will use /opt/db-backups but you can alter this to suit your needs:
mkdir /opt/db-backups
Copy MySQL’s data directory to a storage location. The cp command, rsync, or other methods will work fine, but we’ll use tar to recursively copy and gzip the backup at one time. Change the database directory, backup filename, and target directory as needed; the -$(date +%F) addition to the command will insert a timestamp into the filename.
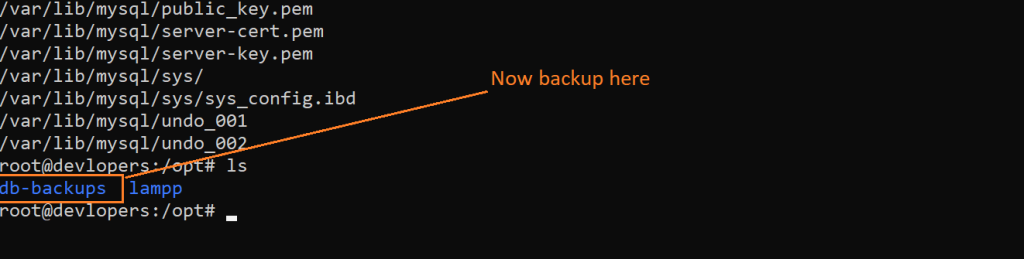
tar cfvz /opt/db-backups/db-$(date +%F).tar.gz /var/lib/mysql/*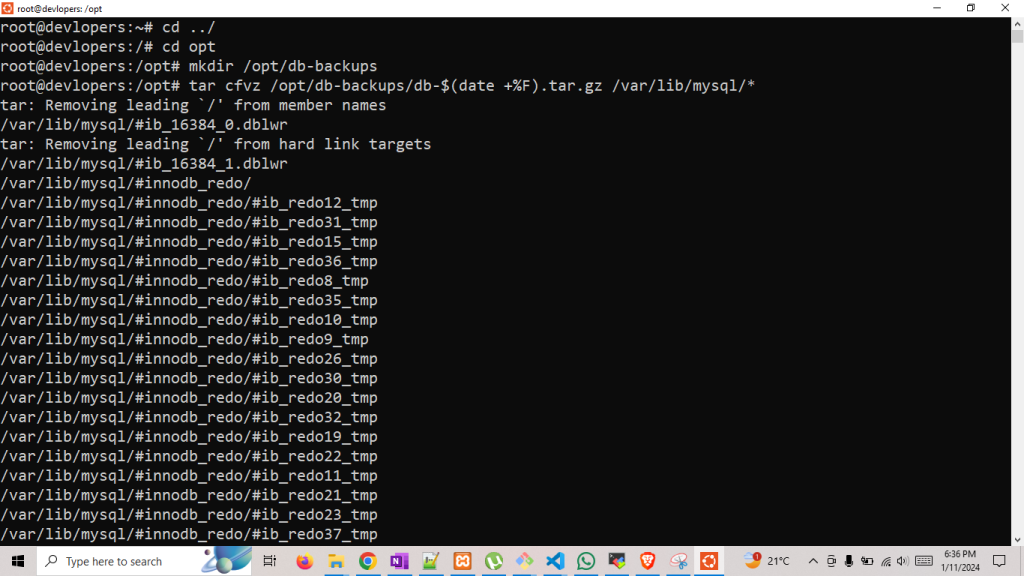
Let’s check the bacup is done or not.
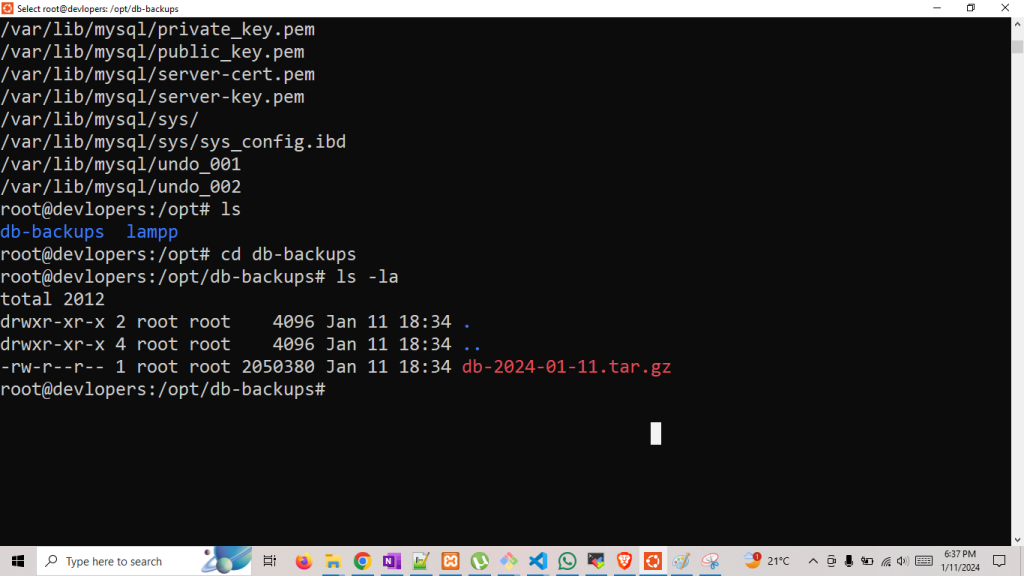
Thanks for learning…